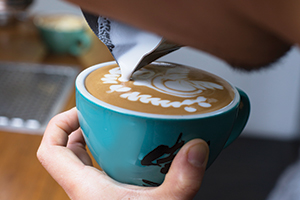
By Shinsaku Fukayama of St Ali, the 2018 ASCA Australian Latte Art Champion.
Hi everyone. Welcome to my first editorial column for BeanScene magazine. I’m so excited to join you for the next year as a regular contributor and share some of my favourite latte art patterns with you.
I’m still pinching myself that I’m the Australian Latte Art Champion. I started in the coffee industry just four and half years ago. Before coming to Australia I was a chef in a Chinese and Japan restaurant for 10 years, but prior to that, I was a professional snowboarder. I first learned to surf at age six, then discovered snowboarding and I never looked back. I competed on the international circuit in more than 200 events, I had sponsors, and I trained hard. Perhaps that’s where I get my discipline.
Unfortunately, a knee injury at 24 years of age stopped my career short, and that’s when I discovered coffee. I Googled where the best coffee in the world was, and the computer told me it was Melbourne, so I came here and I haven’t looked back. I’ve worked up the ranks at St Ali from a kitchen hand to barista, and fell in love with latte art and competitions.
I endured two two gut-wrenching second-place finishes at the national latte art finals, but this year was my turn to be the champion. I’m so proud to be representing Australia at the World Latte Art Championships (WLAC) in November.
But first, I want to share with you a pattern I designed for the 2018 ASCA Southern Region competition, the parrot. I took inspiration for this design from a trip to the zoo. While staring at the bird enclosure, my beautiful wife and coach suggested I should try creating a bird pattern in latte art, so I did. My usual strategy is to Google bird pictures, figure out what body parts aligns with latte art techniques, then try it out: attempt, fail, attempt, fail. It took me three months to perfect, but the good thing about this design is that it embraces all the traditional elements of latte art: rosettas, tulips and drag technique.
The challenging part is cup rotation, definition, placement, and milk ratio. Too much milk and the texture is water, and you’ll have milk wastage. The contrast is important for definition and taste. For this design I’ve used a 300-millilitre cup (WLAC standard) with a 21-gram dose, and 30 millilitre double shot.
I want to make beautiful patterns, but they’re designed to be used in an operational café setting. They shouldn’t just be pretty to look at, they’re designed to be drunk, and because of this, they need to taste good. This means so many elements need to be perfect: the right grind size (fine), milk to coffee ratio, and temperature that will deliver a tasty coffee experience and bring a smile to the customer’s face.
Shinsaku Fukayama’s Parrot
Step 1
Build your base. Pour your milk into the centre of the cup and chase away any white spots that appear on the surface. Mixing the milk into the espresso is so important for contrast. I use a jug with a small tip for better control and precision.
Step 2
Once the cup is filled half way with milk, pour three tulips into the centre of the cup to create the body of the parrot. As you push one layer into the next, you’ll start to see the tulip curve into a “C” shape.
Step 3
Rotate your cup slightly clockwise and pour a rosetta into the centre. I like to say ‘make four wiggles movements’ down the cup. This will create the first wing.
Step 4
Rotate the cup slightly clockwise and make the second wing with the same movement – four wiggles of the wrist to form a rosetta.
Step 5
To create the stomach, aim your pour on the left of the cup and pour another rosetta down the cup (four wiggles). Continue the pour by dragging it down the cup and curve it around to connect with the first part of the body.
Step 6
With your cup handle facing 6 o’clock, pour a rosetta (four wiggles) to create the head. Add a beak by pouring a small tulip.
Step 7
In one motion, form the crest of the bird’s head with three drags or lines of the milk. Drag and stop. Drag and stop. Drag and stop.
Step 8
At the base of the cup, pour two dots for feet, and one for the bird’s eye. A higher pour will create a thinner stream of milk for better definition.


