
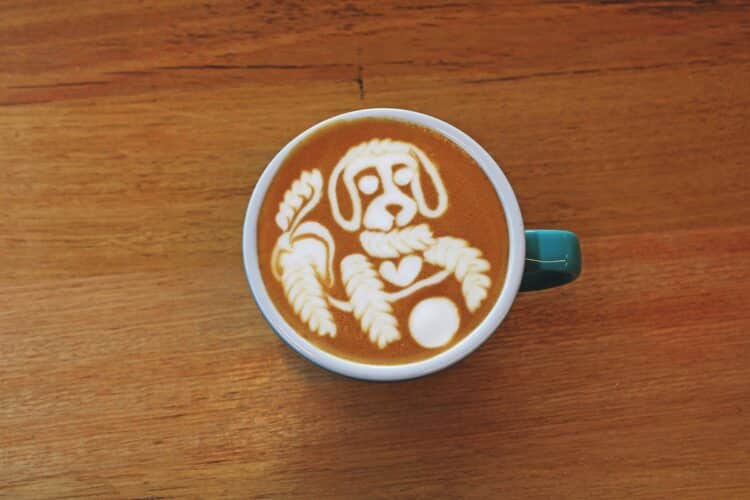
Three-time Australian Latte Art Champion Victor Vu shares his step-by-step guide to recreating the playful puppy design.
According to Victor, this puppy design is one of the most challenging latte-art designs out there because of the many techniques required to bring it together.

“This is a really advanced design. It uses a lot of techniques, including rosettas, tulips, dragging, and drawing with dry foam,” he says.
“What makes it even harder is that all the elements are executed at different angles, but it all comes together in the end to create a really cute and life-like puppy.”
For difficult designs such as this, Victor recommends finessing the pattern on paper before trying to recreate it in the cup. If you can’t work it out yourself, he suggests joining one of his regular latte art masterclasses hosted at Ona.
This design was originally created by Yuanyi Zhang, known as Zking, who was crowned Chinese Latte Art Champion in 2025. Victor says he’s learnt a lot from Zking’s videos and has met him several times over the years.
“He’s been in the industry for more than a decade and creates some amazing designs. I’m really happy that he won the recent Chinese Latte Art Championship,” he says.
“I’m looking forward to competing against him in the World Latte Art Championship in San Diego next April.”
Victor Vu’s Puppy

Step 1
Using a 10-ounce cup, start by mixing the milk with the coffee until the cup is about a third full.

Step 2
With the handle at the two o’clock position, pour a two-stack tulip on the left-hand side of the cup at nine o’clock. To form the belly, from the bottom of the tulip drag a fine curve towards the handle.

Step 3
At the top of the tulip, pour a small five-leaf rosetta along the top curve of the cup to form the tail, then drag a fine line back to where you started along the right-hand side of the rosetta.

Step 4
Turn the handle to four o’clock. To connect the front legs and create the collar, pour a small six-leaf rosetta.

Step 5
At the top of the tulip, pour a small five-leaf rosetta along the top curve of the cup to form the tail, then drag a fine line back to where you started along the right-hand side of the rosetta.

Step 6
Turn the handle to three o’clock. In line the collar towards the top of the cup, pour a small five-leaf rosetta to form the top of the head.

Step 7
From the end of the rosettta, use a continuous drag to form the right ear. Then from the left-hand side of the same rosetta, drag to form the left ear, then continuous pour to form the inner face including the nose.

Step 8
From the end of the rosettta, use a continuous drag to form the right ear. Then from the left-hand side of the same rosetta, drag to form the left ear, then continuous pour to form the inner face including the nose.